
Calling all Qodly Newbies: Build a Simple Pet Contest App
Have you been curious about Qodly but unsure where to start? This post is your perfect introduction!
Today, I'm taking you on a journey through building a fun and engaging application – a pet contest! But this isn't just any pet contest app; it's a chance to explore the exciting capabilities of Qodly, the hybrid low-code platform.
As someone who's transitioned from software engineering to product and marketing, I'm always on the lookout for tools that bridge efficiency and customization. Qodly's promise of both intrigued me, and I couldn't wait to test it with a simple yet engaging app—a pet contest!
Building our Pet Paradise
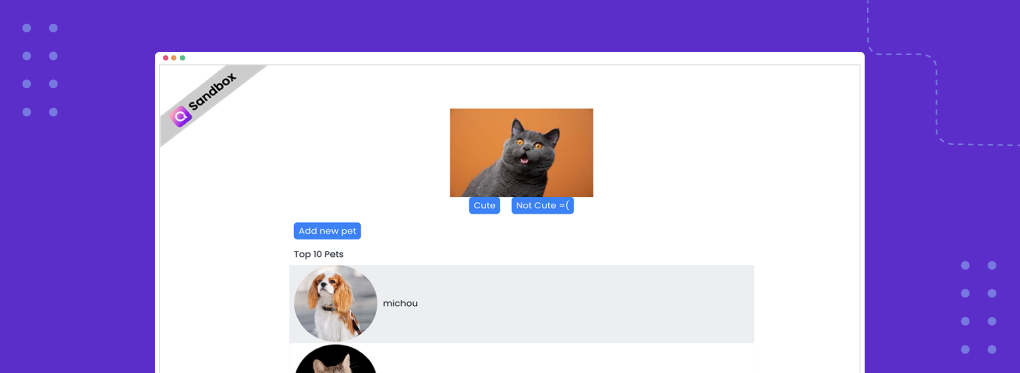
The application's idea is straightforward, a single-page interface where users can participate in three key actions:
Add pets: People can upload a picture and name for their pet, adding them to the contest.
Vote for pets: This is the fun part! Users can vote for their favorite pets, making the cutest ones more popular.
See top 10: Witness pet popularity come alive as the top ten "cutest" pets are displayed based on the votes.
This seemingly straightforward app serves as a perfect example to showcase Qodly's basic functionalities.
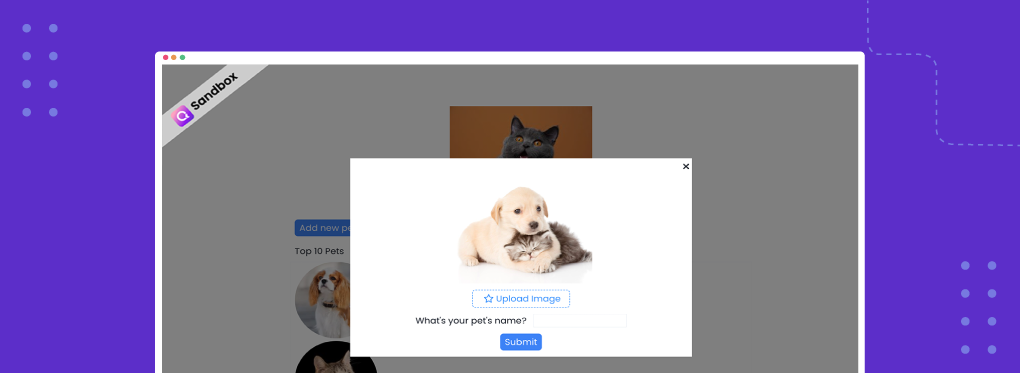
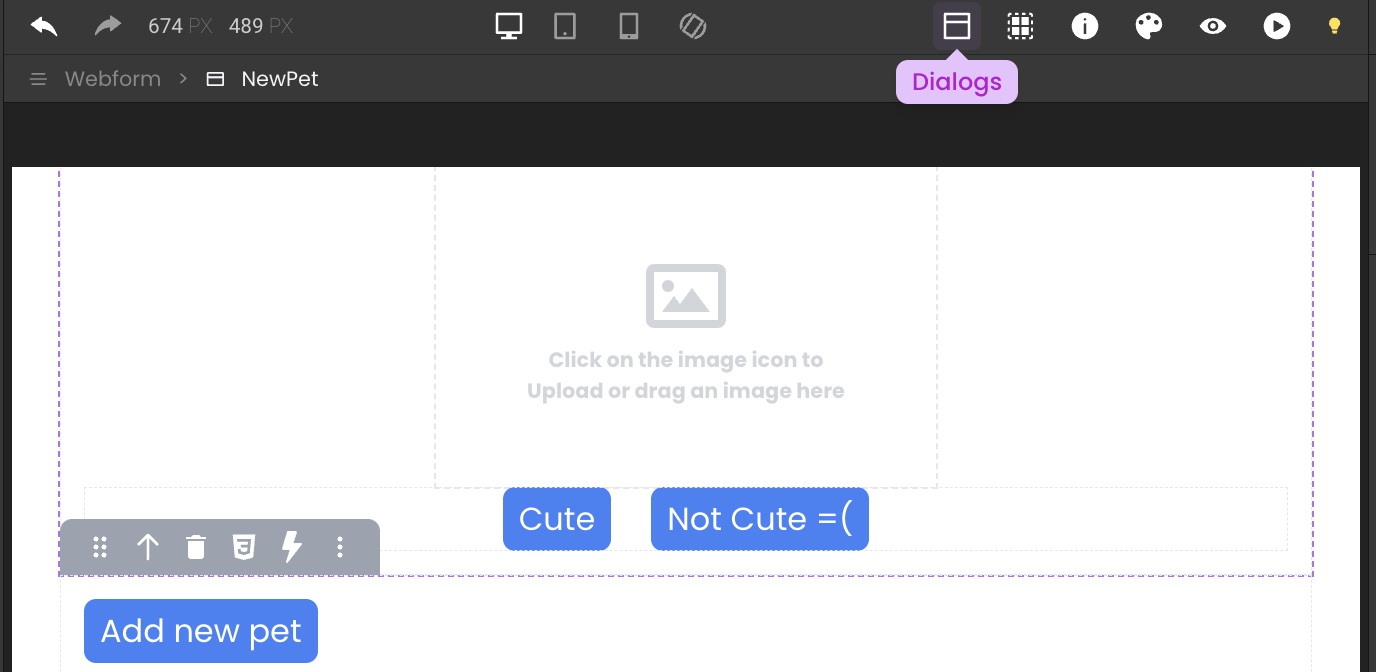
Clicking the "Add New Pet" button will open a dedicated dialog, allowing users to upload their pet's picture and name. We'll delve into configuring this pet submission process in the next section.
Building the backend with Qodly
While the user interface may appear simple, there's some magic happening behind the scenes (don't worry, it's friendly magic!).
In this blog post, we'll delve into the world of models and webforms, the building blocks of our pet contest app.
We'll see how Qodly eases the process with its intuitive tools.
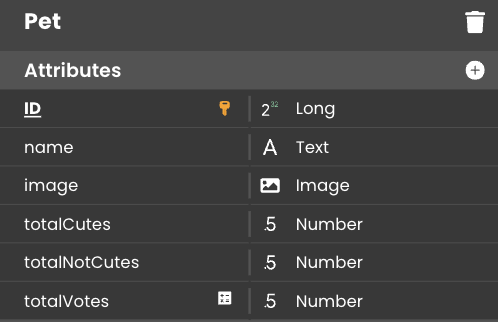
Create The model
The model defines the data structure for our app. We'll create a dataclass named Pet to hold information about each pet. This dataclass will have attributes like name, picture, and other relevant details.
Create The webform
This is where users will interact with the app and provide information about their pets.
Qodly makes building web forms easy, even for those without coding experience! It allows you to create the form layout visually using drag-and-drop functionality.
Create a new webform and call it index. Start dragging your components (see the following section).
Setting Up The Voting Section:
For the voting section:
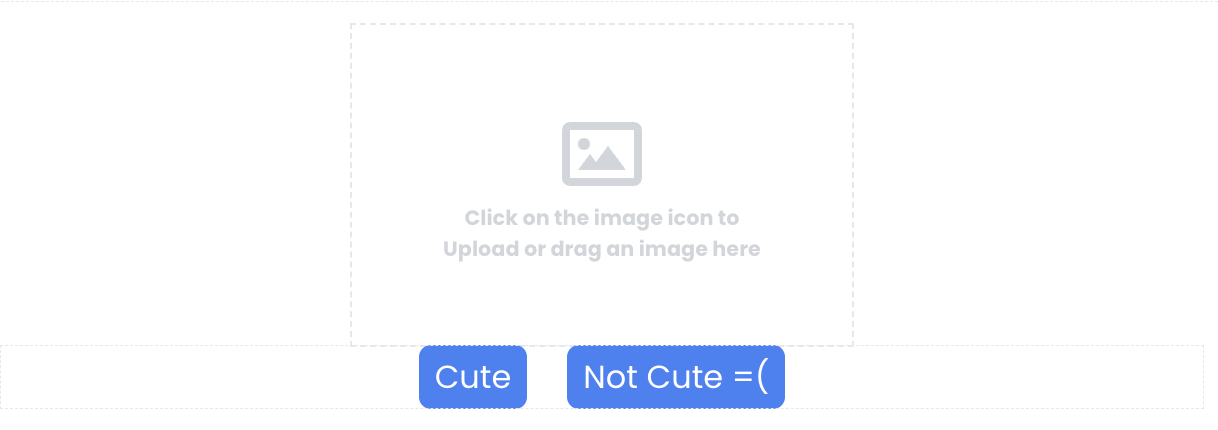
- Start by dragging a stylebox: This will act as a container for the voting elements.
- Inside the stylebox, drag an image component: Place this inside the style box to display the pet image users will vote on.
- Drag two buttons with the labels "Cute" and "Not Cute" inside the stylebox to capture users' votes.
Adding a new pet:
Now, let's move to the action of Adding a new pet.
Drag a button onto your workspace. Clicking this button will later open the pet creation dialog.

Displaying top 10 pets:
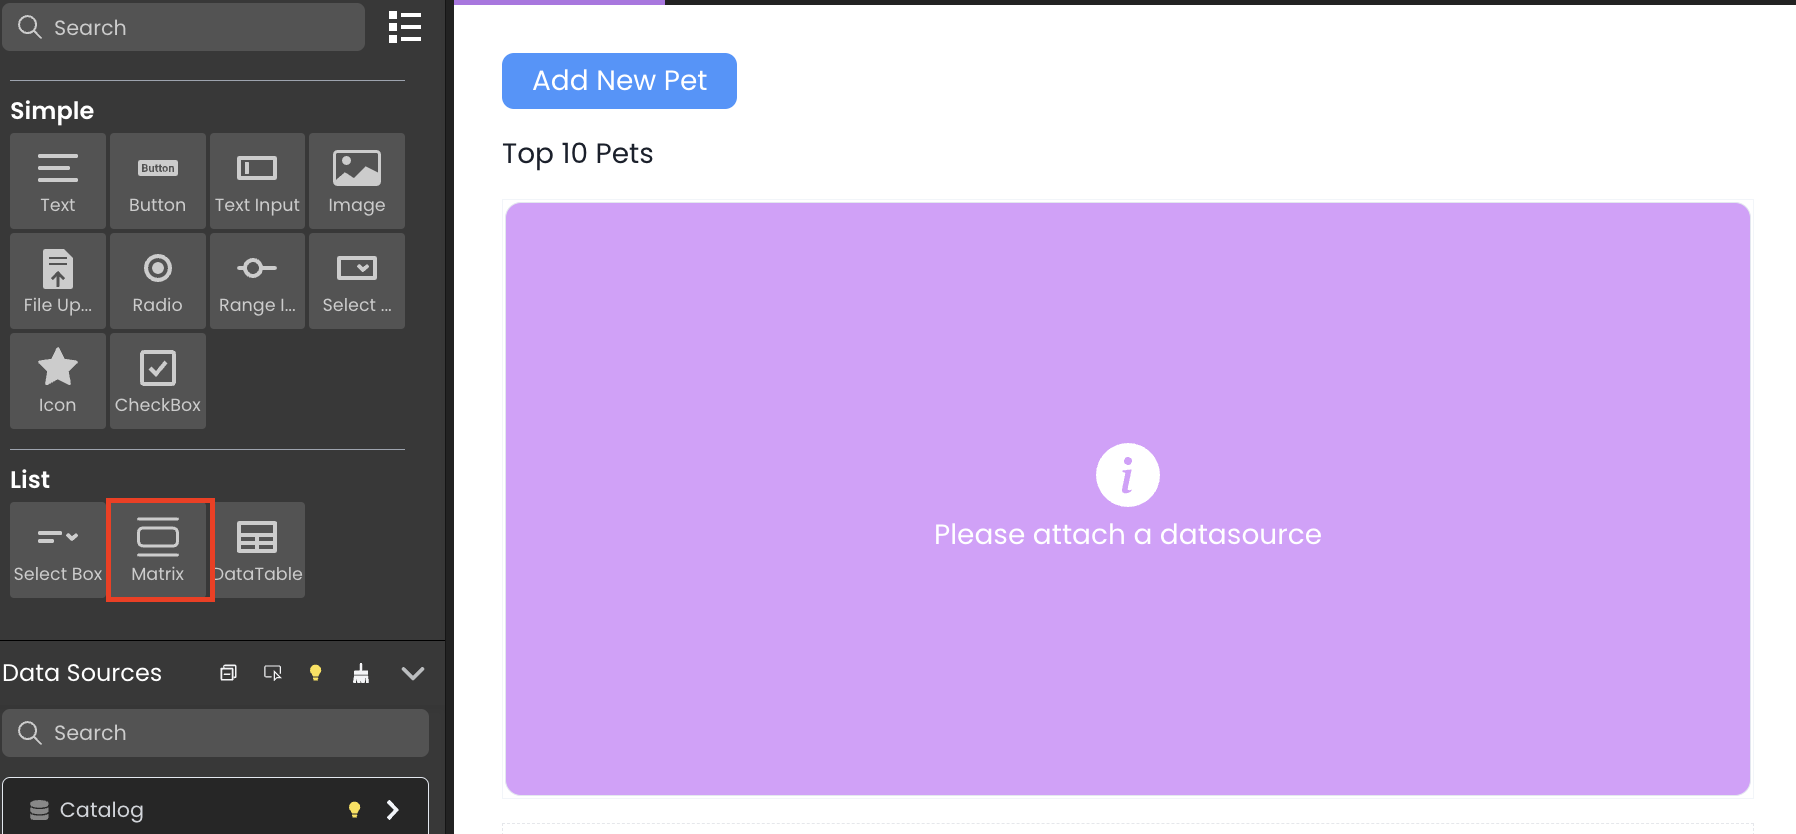
To show the top ten pets, drag a matrix components inside the stylebox. Think of this matrix as a grid layout that will showcase the top ten pets.
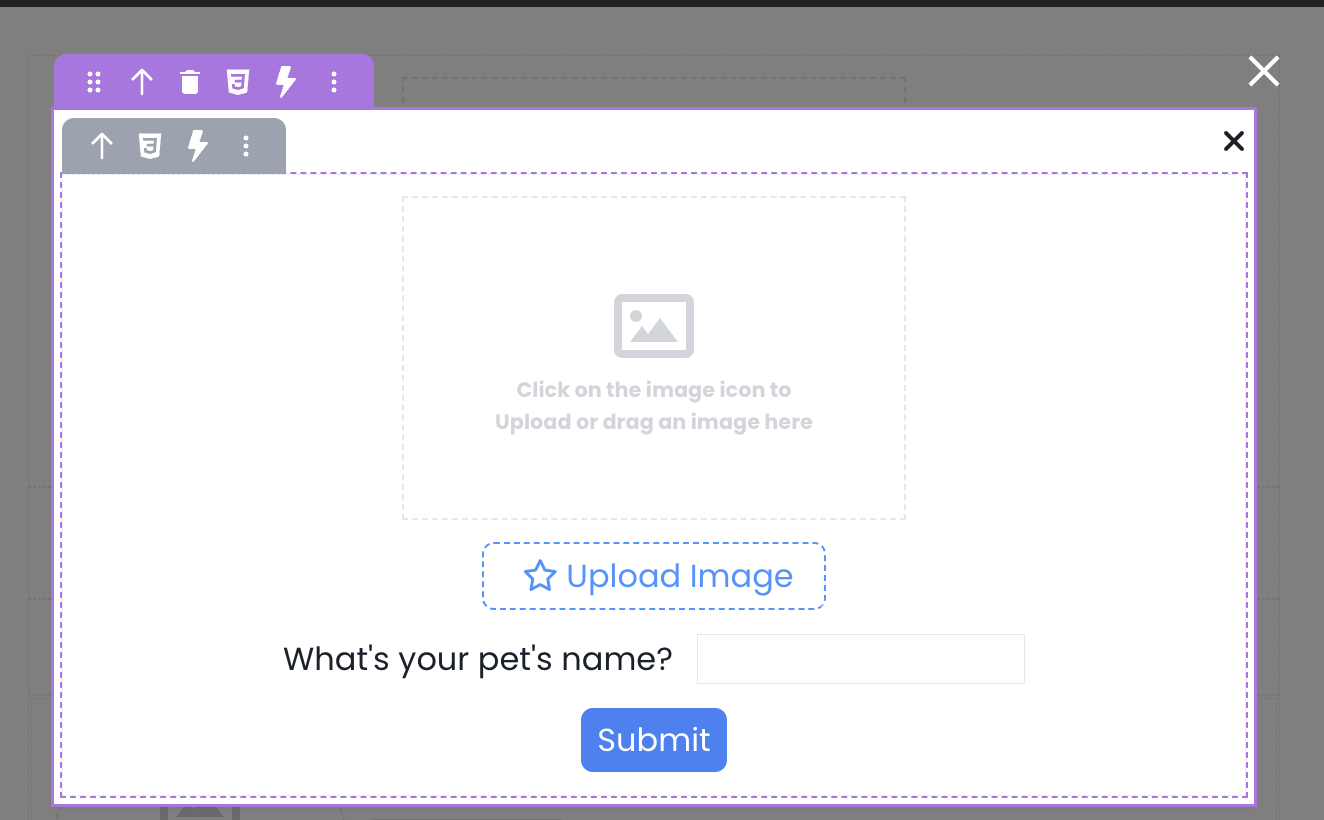
Creating The Pet Creation Dialog
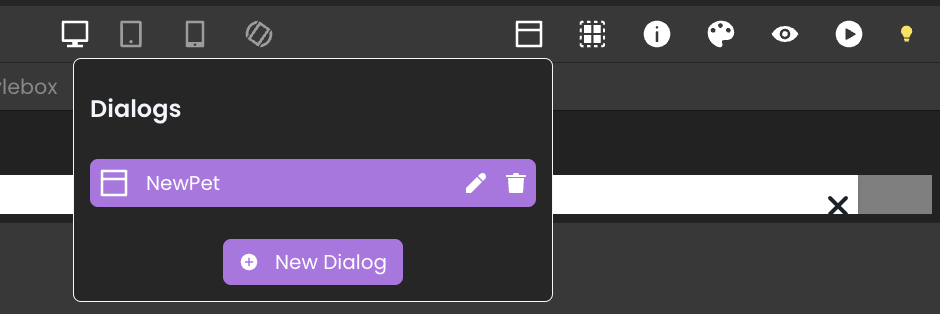
Once users click the "Add New Pet" button, they'll need a way to provide information about their pet. In Qodly, this could be done through a dialog.
From the Qodly interface, use this button to create a new dialog and name it "addPet".
Within the dialog, use drag-and-drop to add the following elements:
- A file upload component where users can select their pet's picture.
- A text input field for users to enter their pet's name.
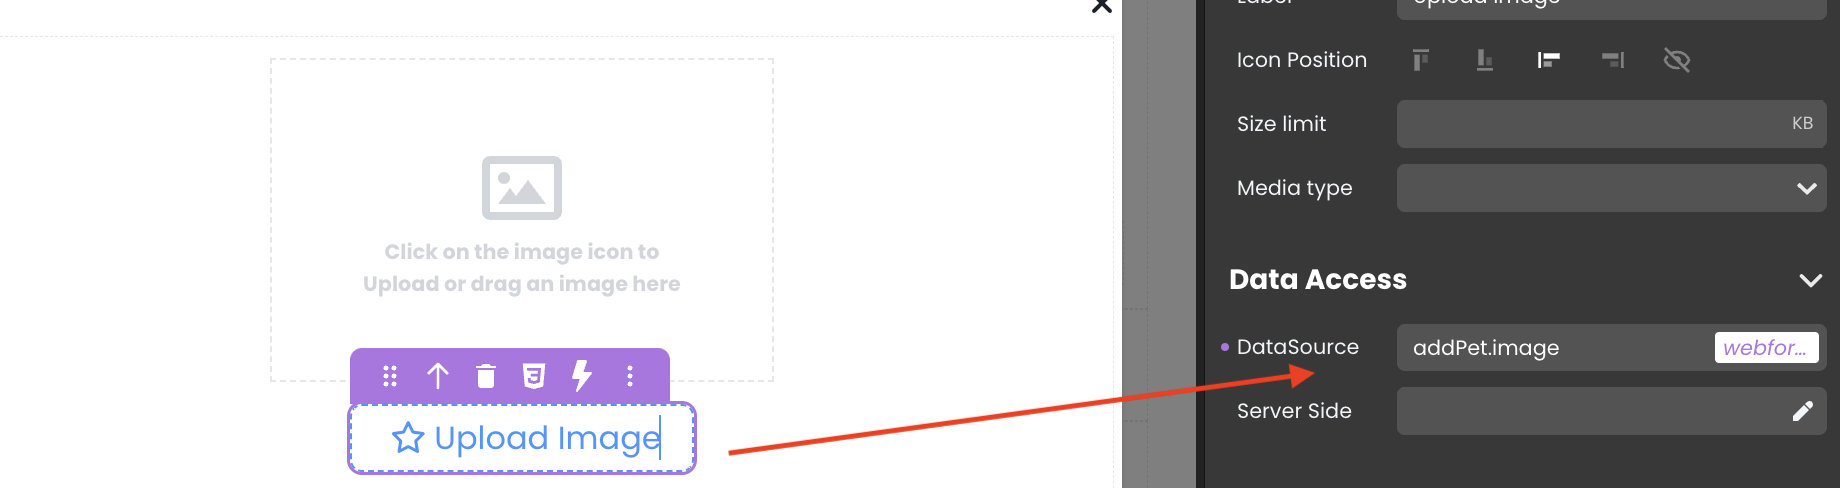
- You can optionally add an image component that displays a default image when the dialog first opens. This can provide a visual cue to users about what kind of image they should upload.
Wiring Everything up
Here comes the fun part!
Now that you've built the visual structure of your web form using Qodly's drag-and-drop features, it's time to connect everything and make it functional.
This will likely involve writing some code (don't worry, Qodly simplifies this process too)!
Adding a new pet
The first step is to allow users to submit new pets to the contest. Qodly's standard actions make this process easy—no single line of code is needed!
Go ahead and open your dialog,
What We Want to Achieve
Before diving into the configuration, let's clarify the goal here: When the user uploads a pet's image, enters a name, and clicks "Submit," we want that information to be saved as a new entry in your database.
But before we get there, there's an important step: Mapping user input to the database.
Before we configure the button to save new pets, let's ensure the user's input is properly mapped to the corresponding fields in your database. Here's how to achieve this:
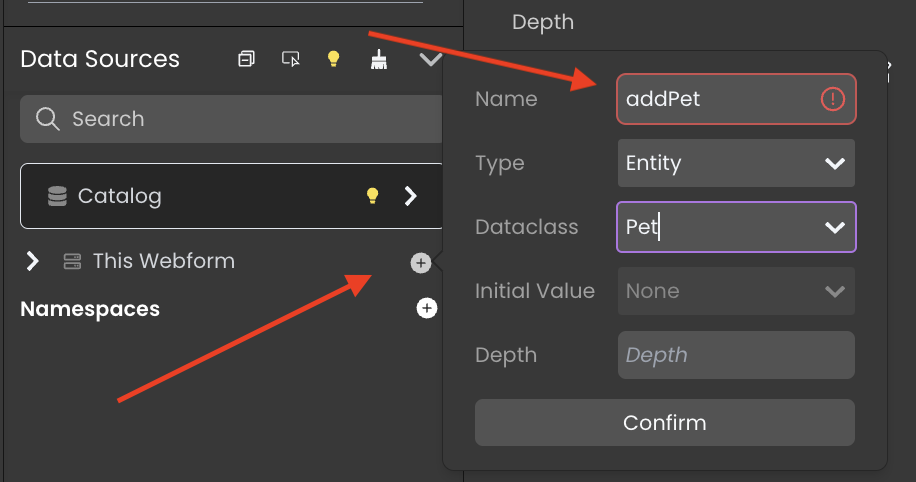
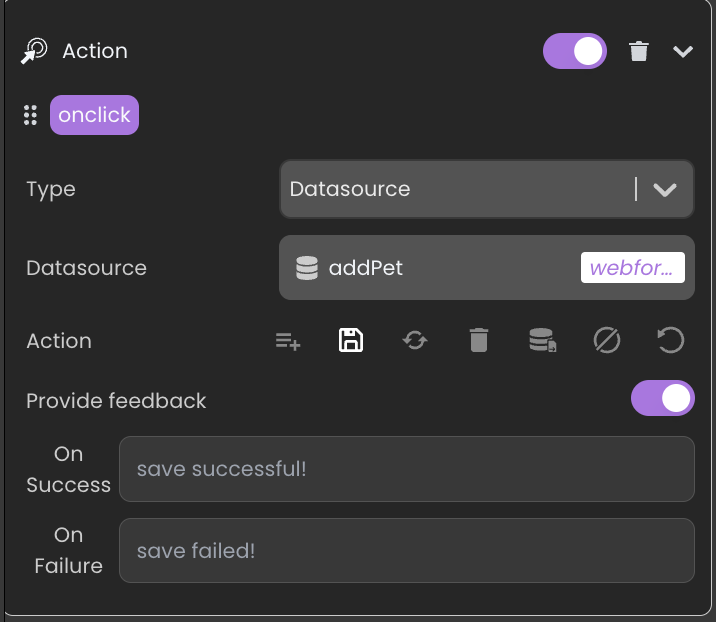
1 - Create a data source of type Entity: Name it "addPet". Refer to Qodly's documentation for detailed instructions on creating a data source of type "Entity" that reflects your pet's data structure (e.g., name, picture, etc.).
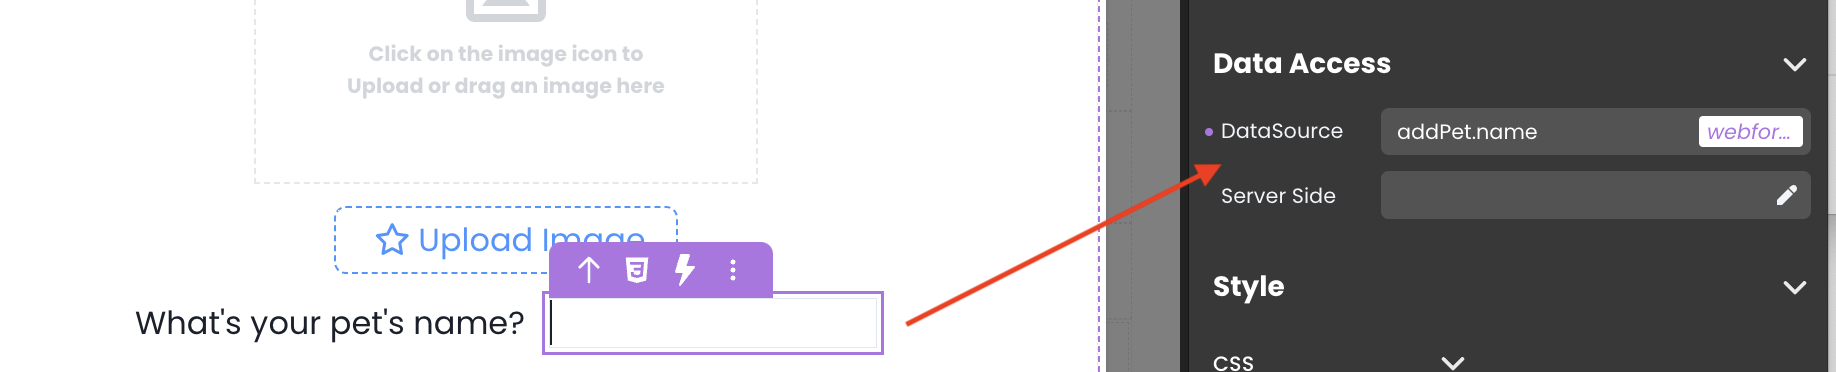
2 - Map input fields to entity properties: Once you have the entity data source, use Qodly's interface to map the user input fields (pet name, picture) to the corresponding properties within the entity. This ensures the data is stored correctly in your database.
In Qodly's interface, navigate to the events panel for the "Submit" button within the pet creation dialog. This panel allows you to define actions triggered by user interactions.
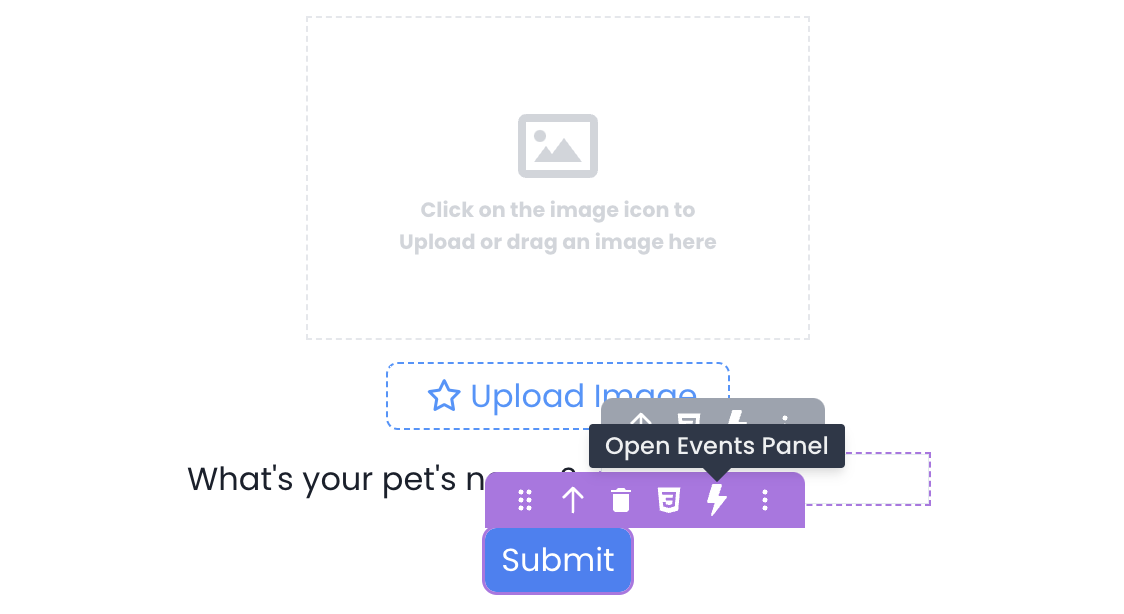
Within the events panel, choose the "on Click" event and then select "Add a standard action."
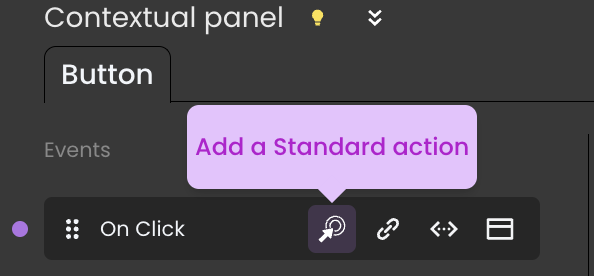
From the available options, select the "Save" standard action. This action will save the data entered by the user to your database.
BUT
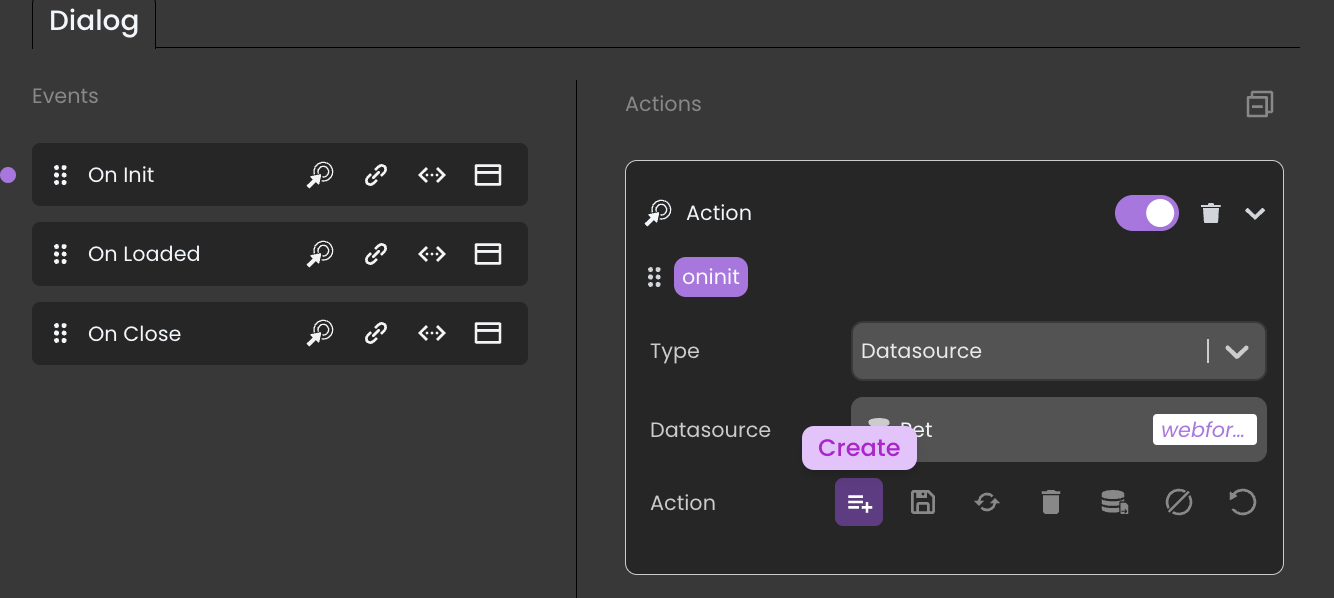
There's a crucial step before saving new pet information: pre-populating the entity with an empty record when the dialog loads (on Init). Qodly will not automatically create a new entity instance for you to save.
By pre-populating the entity, you essentially create a blank "container" for the user's input. When the user clicks "Submit," the data entered (pet name, image) will be populated into the existing entity, allowing you to successfully save it to your database using the "Save" standard action.
Once you've configured the button action, test the functionality by adding a new pet. The user should be able to enter pet information, and clicking "Submit" should successfully save the new pet entry to your database.
Bonus
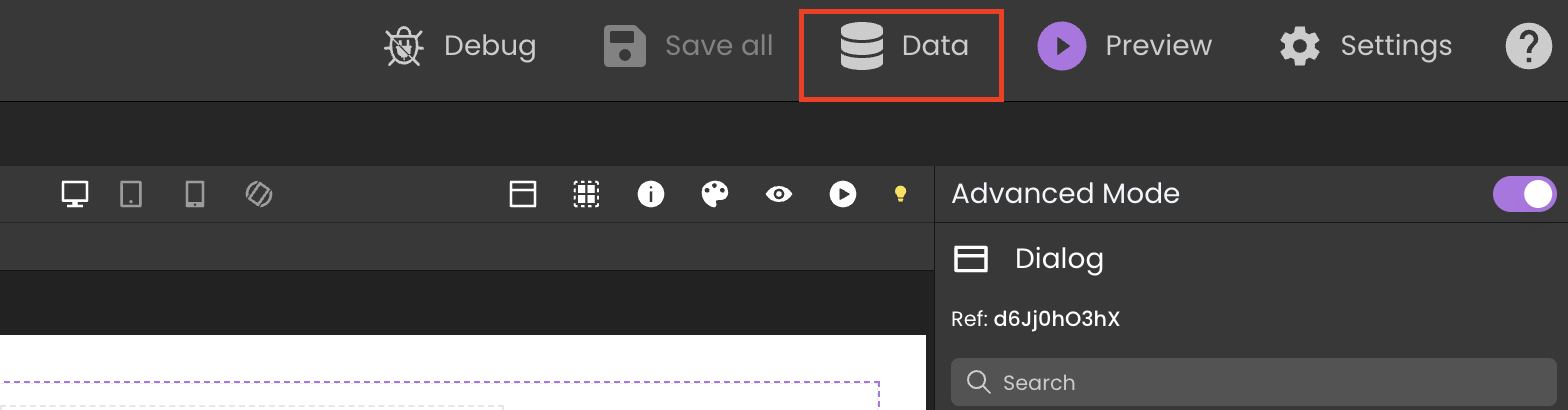
Qodly offers a built-in Data Explorer, a web interface that allows you to:
- Browse and Inspect: Easily view all your entities (including pets) and their data.
- Search and Filter: Quickly find specific pet entries using search and filter options.
- Edit on the Fly: If needed, you can directly edit data within the Data Explorer for troubleshooting or adjustments.
Locate the Data Explorer within Qodly's interface:
If you can find your newly added pet with the corresponding details (name, picture), then congratulations! You've successfully saved the pet entry.
Displaying the top ten pet
Now that you can add new pets, let's showcase them on the main interface!
Here, Qodly's configuration shines with its user-friendly approach.
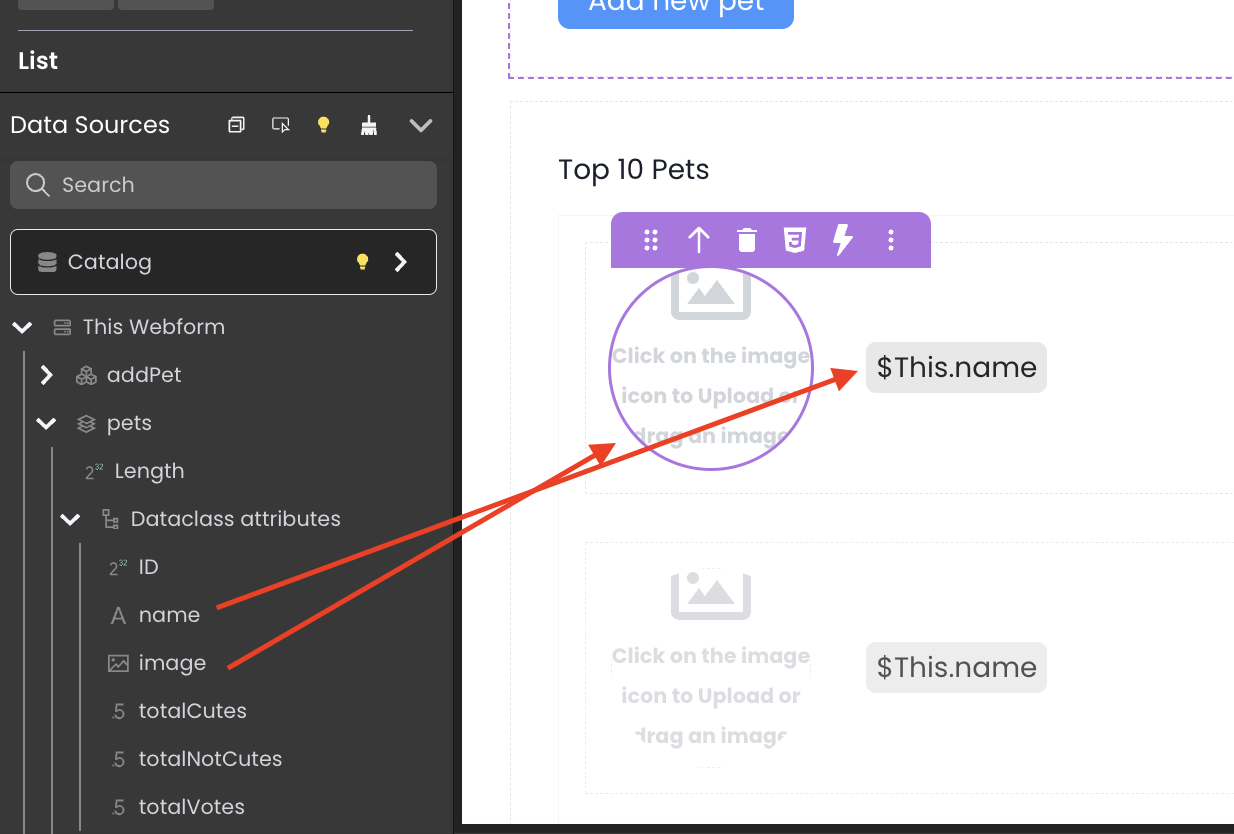
Start by creating a data source of type "Entity Selection." Name this data source "pets" to clearly represent its purpose. This data source will act as a bridge between your application and the database, specifically retrieving information about the top ten pets.

With the "pets" data source created, it's time to connect it to the visual element displaying the pet list.
This element is a "matrix" in Qodly. Use Qodly's interface to map the "pets" data source to this list element.
Now, it's time to personalize how each pet is displayed on the list. Drag and drop the desired elements you want to show for each pet, such as the pet's name, picture, and any other relevant information. Qodly's visual interface should allow you to easily position these elements for a visually appealing presentation.
Adding a CSS touch
While we'll delve deeper into CSS styling in a future blog post, feel free to experiment with basic visual adjustments from the right-hand panel within Qodly's interface. You can adjust spacing and add a border radius to your image.
For now, you should be able to see the whole list of pets in your database. Let's refine it to see only the top 10.
Let's create a function that does that.
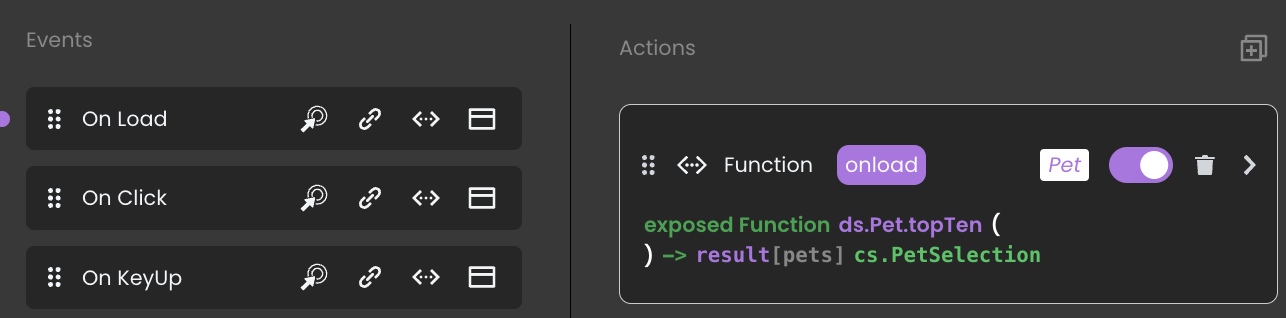
Go to your Qodly model and create a new function named topTen. This function will return a selection of pets, specifically the top ten "cutest" ones.
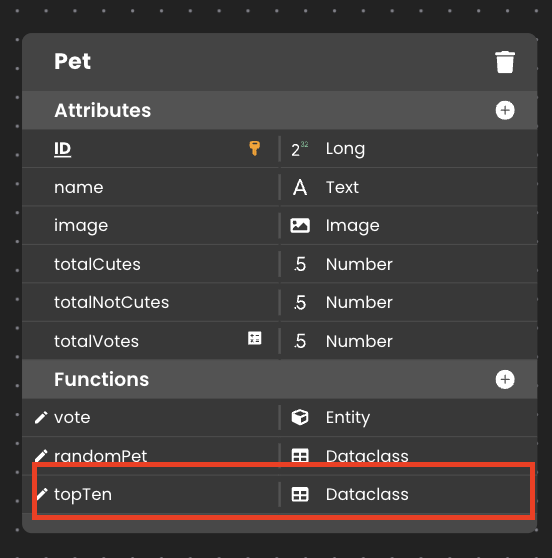
It will automatically create the function in the Pet class.
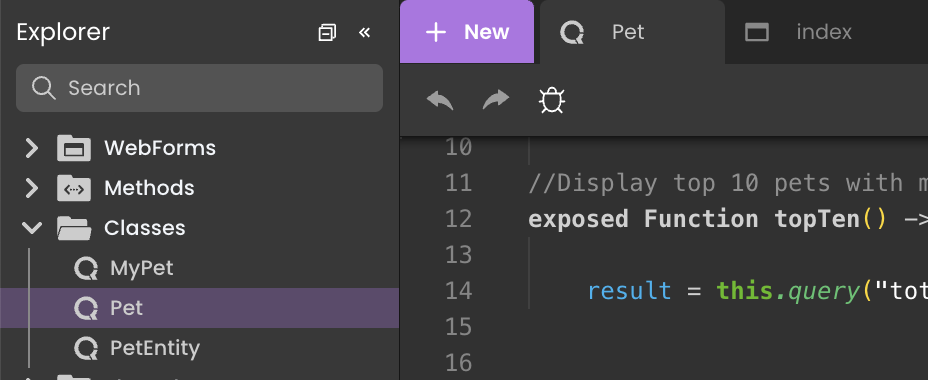
Simply add this code that displays the top ten pets:
exposed Function topTen() -> result: cs.PetSelection
result = this.query("totalCutes > totalNotCutes").orderBy("totalCutes desc").slice(0,10)
This code snippet showcases the logic behind the topTen function:
- .query("totalCutes > totalNotCutes"): This filters the pet selection to only include pets where the "totalCutes" score is greater than the "totalNotCutes" score.
- .orderBy("totalCutes desc"): This orders the filtered pet selection by their "totalCutes" score in descending order (showing the most "cutes" first).
- .slice(0,10): This limits the final result to the first ten entries, effectively retrieving the top ten "cutest" pets.
In the next step, we'll configure Qodly to call this topTen function when the webform loads, ensuring only the top ten pets are initially displayed.
Let's move to the last part.
Voting functionality
Now that you have the cutest contenders showcased, let's allow users to cast their votes!
We'll implement two functions in Qodly to achieve this:
- randomPet function: This function will retrieve a random pet from the database, ensuring a dynamic voting experience for users.
- vote function: This function will handle user votes, incrementing either the "totalCutes" or "totalNotCutes" score in the database based on the user's choice.
randomPet function
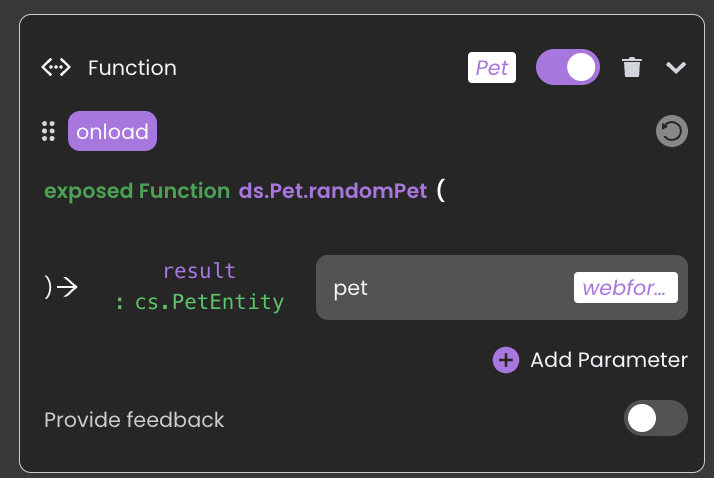
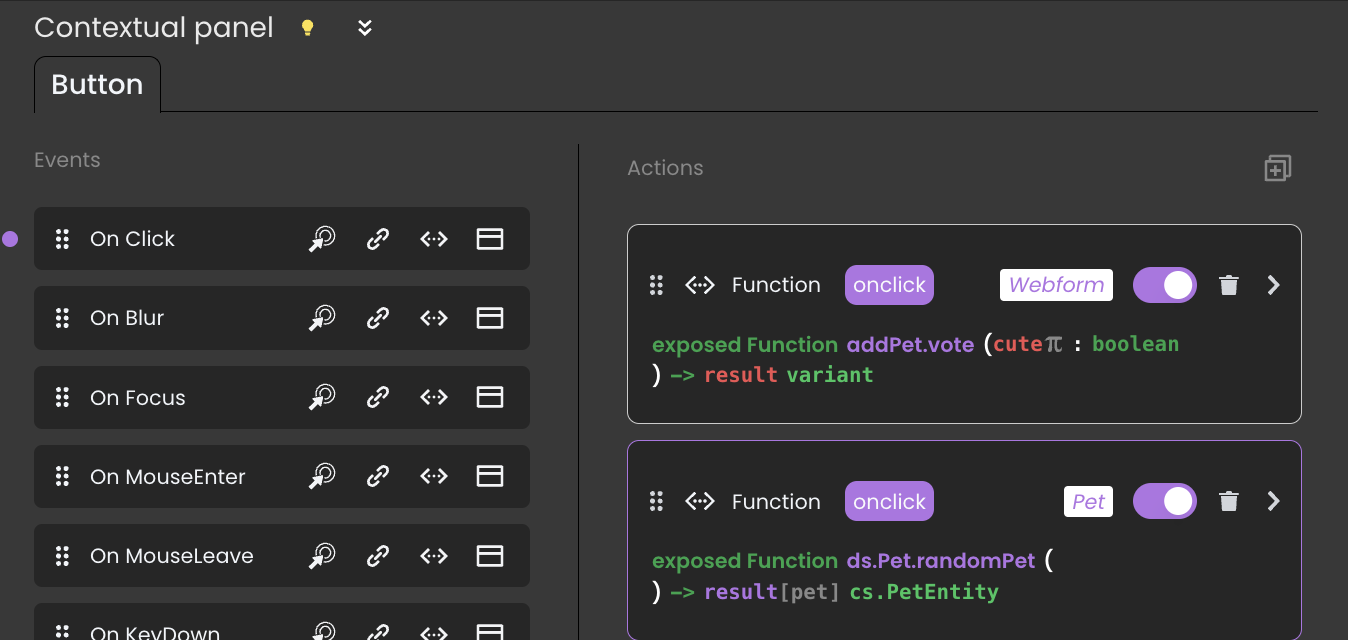
Go to your Qodly model and create a new function named randomPet. This function will return a single random pet entity.
exposed Function randomPet() -> result: cs.PetEntity
var pets: cs.PetSelection
pets = this.all()
result = pets.at(random%pets.length)
This function retrieves all the pets using this.all().
It then uses the random() function to generate a random number within the range of the pet selection's length. Finally, it uses the at(index) method to access and return the pet entity at the randomly chosen index.
Next, create an additional data source of type Entity and name it "pet". Then, map the pet.image field to the image component on your form, ensuring that the pet's picture is displayed correctly.

Vote function
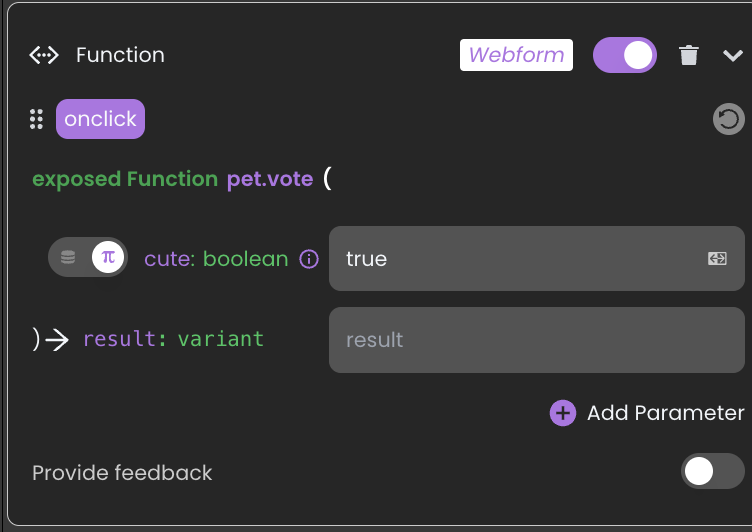
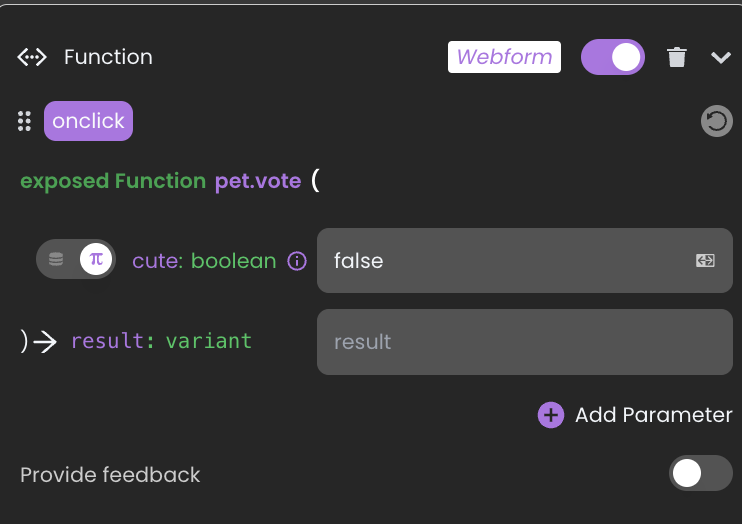
Go to your PetEntity class (where individual pet data is defined) and create a new function named vote. This function will take a boolean argument (cute) indicating the user's vote.
exposed Function vote(cute : boolean)
 if (cute)
  this.totalCutes+=1
 else
  this.totalNotCutes+=1
  end
  this.save()
Connecting Functions to User Interactions
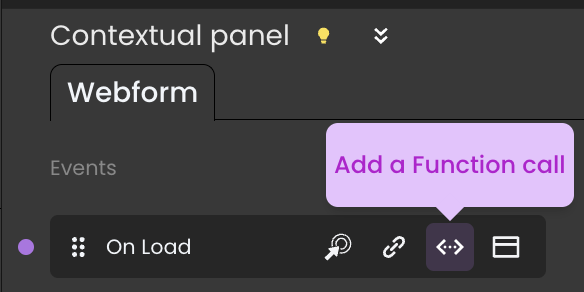
In Qodly's interface, configure your webform's onLoad event to call the randomPet function. This will ensure a random pet is displayed initially for voting.
Configure the "Cute" and "Not Cute" buttons with the onClick event. When a user clicks either button, trigger the vote function, passing true for "Cute" and false for "Not Cute" to update the corresponding vote count.
Additionally, make sure to assign the randomPet function to the onclick events of both the "Cute" and "Not cute" buttons. This will ensure that each time a user votes, a new random pet image is displayed, keeping the experience dynamic and engaging.
Test the functionality by running your application. You should be able to see a random pet displayed on load. Clicking "Cute" or "Not Cute" should update the pet's respective vote count.
Congratulations! You've successfully built a core voting system for your pet contest application using Qodly's functionalities.
Coming Up Next
This is just the first step in our journey!
In the next part of this series, we'll use the power of CSS to create a visually appealing user interface. We'll also explore how Qodly empowers you to personalize your app beyond the basic functionalities.
Stay tuned for exciting updates, and get ready to build your own delightful pet contest app!
Meanwhile, if you have any questions, feel free to connect with us on the Forums or Slack.
Hybrid Low-code Platform For Your Business Apps
Have freedom of customization while avoiding the constraints of No-Code limitations. Try Qodly for Free!

How Qodly Makes GDPR Compliance Easier for Developers
In today's interconnected world, where data fuels innovation and drives technological advances, prot...
Low-code vs. No-code: Unveiling the Key Differences
In software development's changing landscape, two words have become increasingly important in recent...
Build Your Trello Clone in Minutes! (Video Tutorial Included)
Throughout my career, I've tried various project management apps, but I often found them lacking in ...
Build Beautiful Front-End Pages in Minutes with Qodly
In web development, having a unified tool that bridges the gap between designers, clients, and devel...

Formula vs. Development Platforms: Choosing the Right Tool for Your Needs
Choosing the right platform to build your software can be overwhelming. Two popular options are form...
When Low-Code/No-Code Development Works (and When It Doesn't)
For years, businesses have been stuck between two extremes when needing new software: custom develop...
Exploring Qodly Custom Components
Qodly introduces the concept of Custom Components, empowering developers to extend the platform's ca...

Announcing the Qodly HackDev24 – Code for Gold!
Calling all developers, sports fans, and creative minds! Are you passionate about the sport and exci...

Is Qodly Suitable for Citizen Developers?
In today's fast-paced business world, the demand for custom applications is higher than ever before....

Let's celebrate together Qodly's first Hackathon: DevHack24!
Who was the hackathon aimed at, and what was the theme?The very first Qodly Hackathon on the sports ...
Key Features to Look for in a Low-Code Platform
As businesses strive to keep up with rapidly evolving technology demands, low-code platforms have em...
How to Build a Custom Application
Businesses often use custom apps specifically designed to automate workflows or enhance customer exp...